Showing posts with label handcraft. Show all posts

Monday, February 18, 2013

Handmade Photography Props for Rent


This is the green idea project for making most of the props from recyclable materials and used materials and sharing props or renting out to other creative photographers who is looking for props to be added into picture of the photographer's vision.
Every prop or set of props will be priced different according to the quality and quantity.More props will be added into the album once new handmade props are produced.


This was my first handmade masquerade and it is heavy and big. There's one little damage on one side of the masquerade if you notice on the photo. Renting fee charge RM 8 per day for this purple masquerade and deposit RM30 is required to pay and will return back to you the deposit once you return back the masquerade in good condition without any damages. If damages were made on masquerade or lost, the deposit will not be return.
Do take good care of all the rented props and not making them dirty. All the props are not need to be washed/cleaned when returning back to me, I will handle the cleaning.
For more information and inquiries, do write in to me on facebook or email to JasonLHY90@gmail.com


The wolf/fox mask was my second time handmade mask.


Renting fee charge RM 5 per day and deposit RM20 is required to pay and will return back to you the deposit once you return back the props in good condition without any damages. If damages were made on the props or lost the props, the deposit will not be return and become the payment of loss and damages.


This was self plaited pauldron/shoulder wear earthy look props with the necklace. 

Renting fee charge RM 8 per day for the whole set, including the necklace. If you are interested to get the whole look of the sample picture shown with the strings/threads tie around the neck, no extra charge for renting out the string/threads neck wear, do let me know through email or messaging.
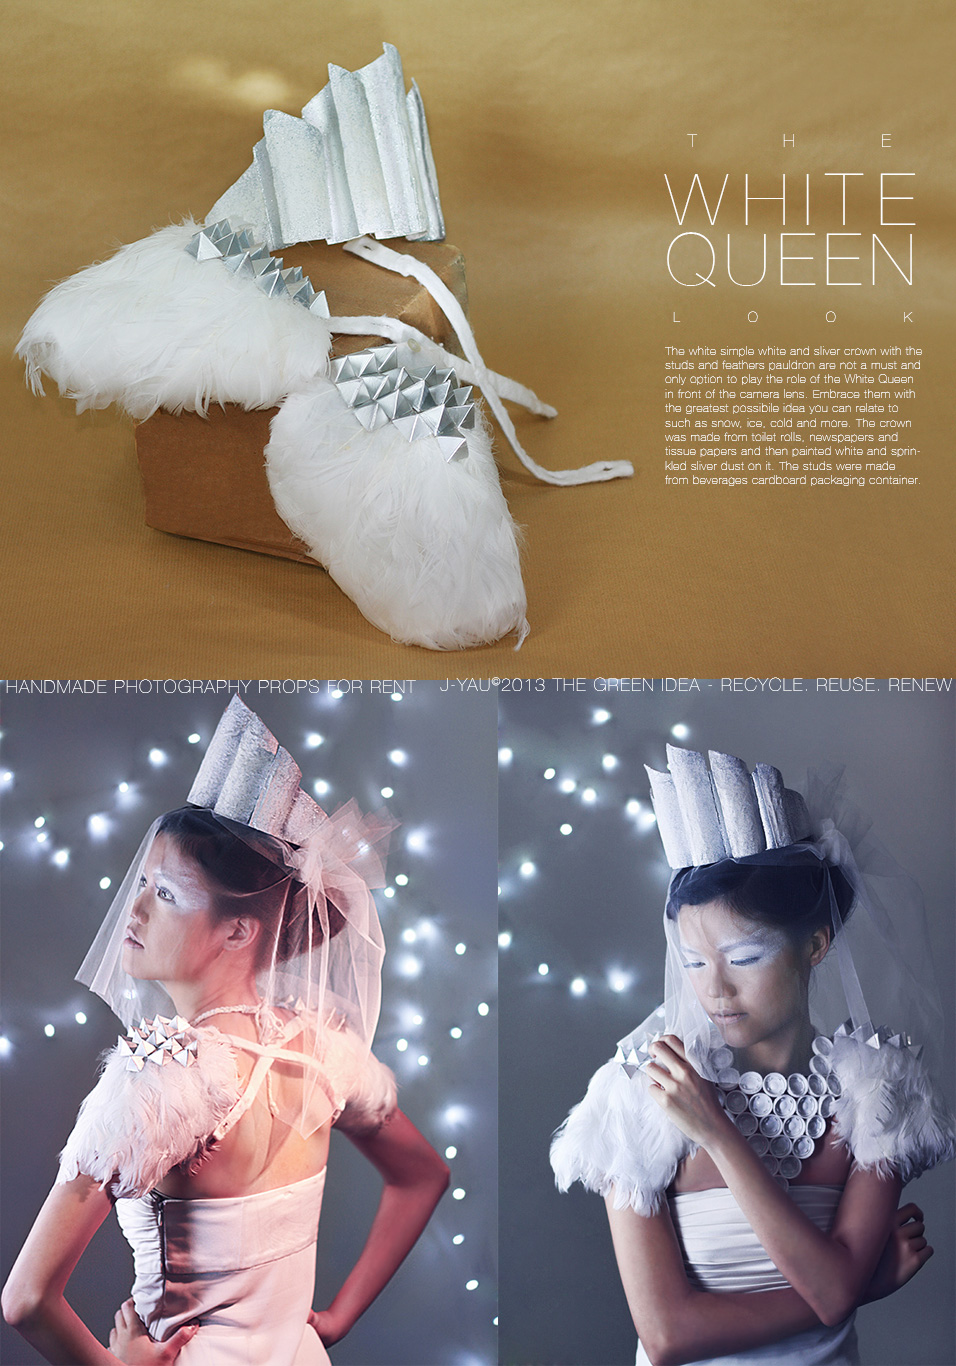

The studs were made from beverage drink packages cardboard and its hollow/empty inside. Do handle them with care without squashing or flatten them.
Renting fee charge RM 8 per day and deposit RM20 is required to pay and will return back to you the deposit once you return back the props in good condition without any damages. If damages were made on the props or lost the props, the deposit will not be return and become the payment of loss and damages.

If you are interested to rent the full set of props for this white theme look including renting the necklace together, extra RM2 rent charges will be added to the renting fee of the whole set, which are the crown, the pauldron/shoulder wear and the necklace.

Saturday, February 9, 2013

The making of the props of "The White Queen" + Butterflies Hat

After done making the crown and the necklace, you can refer back to these two links if you like to have a look back on the crown:


After done the crown and necklace, I got contacted by a friend asking whether I would like to buy some feather from her to make props or accessories since I have big passion in making them. I decided to buy and make a shoulder wear with feathers to match the White Queen theme. I bought 100 feathers.  I measure and sketch the shoulder sleeve cutting based on a cheongsam of my sister who also is the model for this photoshoot. I followed the cutting and customised them into shorter sleeves. I hand sew them with a adjustable cross lines at the back which can be attached or detached. Then, I bought a RM5 fabric glue to stick the feather which is the tedious part of the process. I iron the feathers one by one to flatten and straighten the feathers. Then I stick them one by one, one row at a time and wait them dry.  

Monday, December 17, 2012

Progress update

Dear panda head, I wish I can complete you with a snap of my fingers! Wonder when can I completely done with it. I still need to make raccoon head which haven't start at all! I guess I need to draw more Daccoon episodes at the mean time.

On the other hand, I am continuing making the second look which is the butterflies look as I have mentioned in the previous post. This is pretty time consuming work, I was cutting out all the butterflies with two different sizes from the recyclable card board from drink container such as fruit drinks, or soya bean drink container, hope you get what I mean.

Pasted one layer of used/printed one sided white paper on the side of the cardboard which have prints on as I want the butterflies to have just the sliver side and the white paper covered side. Then, I sprayed them with spray mount to allow the sliver glittering dusts stick on them. Better make sure you have good air ventilation in your room because it does smells while doing this process. After dried, spray one more transparent aerosol spray layer as it serves as a lamination or protection and remove the sticky function from spray mount which have on the butterfly shaped cards.

Next, i sew them on a black net hat which I made from a duct tape and potatoes container net which you can find it from supermarkets. But before you use them, make sure its clean.  

This was a snap photo of me trying out the hat which was halfway attaching them to the net

Tuesday, December 4, 2012

The making of a simple crown

Its my first time making a crown and I do think I made it wrongly as you can see how funny or odd it looks like on my head. But I am thinking to continue making it, the design is still the same like what I previously sketched, just became bigger slightly, so I maybe wanting to make the model's hair big volume, frizzy or wavy, still thinking though.

and of course, it doesn't fit my head size because I made it according to her size.

But still look big and I know why because I made the front part extended forward from her head size so look bigger. =.="

 For the necklace I made it adjustable length, I more satisfy with my necklace.
The works will on going and to be continue and I know I am kind of slow. Sorry about it. I will work my best!

Tuesday, November 27, 2012

Making of props for White Queen project

Images above shown one on the left is the earliest sketch I have made before finalising and the one on the right is the second look as part of the project that I want to photographed in this white themed project.

As I mentioned earlier, you can see this was based on the initial sketch design that I try to make but yet I feel not very satisfying although i initially do want to have the net eye brows to add and give the oddness as what I want to portray.

Rabbit Spoon Holder

This is not something I recently made but something I have missed out on posting it here.Ops! my bad haha. Anyway, can you guess what does the bunny body is made of? Of course you know that ears are the Chinese pattern table spoons.

Monday, July 30, 2012

Handmade Bow Tie 3

This time I spent more efforts on  detailing the bow tie and still remain to my passion on using recyclable, used materials. I chose garbage bag cut into stripes and weave them. I used the beverage card packaging material like from the fruit juice product card container/soy bean card container to make the triangular shapes and form the bow tie shape.


For the packaging box of the bow tie I made as a present box for my birthday friend, I reuse a used car box and mounted/stick one layer of newspaper as it is what I picture for the box. I added doodles and my logo. I drew the triangle with an eye on the box is not only matching the bow tie details and also is a symbol  of unambiguity


Handmade Glasses

My third time making a glasses where this time I have put much more effort and improvement on the glass than my previous ones. I added a simple touch on design by having little 3 stripes at side to gives a sporty kind of feel and this glasses is much bigger than the previous ones which is bigger size like a goggle just for experimenting and fun. Added a plastic shade as lens. The whole glasses frame is made by newspaper with PVA glue, metal strings and little bit of polystyrene I got it from the take away food container.

The image above was my first time handmade spectacles without plastic/lens on it and its fragile.It's only polystyrene and newspapers with PVA glue made. Then painted with mural paint.

Tuesday, July 3, 2012

Big Birthday Cake Card


This is an old birthday card i made for my partner's birthday, I eventually spent almost RM70 (kind of expensive to me but its worth for making someone happy) for printing this in A2 size paper and paste on a card board if I didn't remember wrong. When the card opens up, it forms a chocolate 3 storey cake with his friends printed on card standing on the cake.

Sunday, February 19, 2012

Handmade Bowtie


Hello, I finally have made some time for myself and hand made a bow tie based on looking at one bow tie i had and self customize and stylized it. I bought a stainless steel buttons from Daiso and put the cloth clamped  and covered outer surface of the button. I made this for valentine day. =) Hope you all like it and gave comment. The cloth I get is from unwanted clothes and unwanted cloth from manufacturer.=) The string attached around the bow tie with a colored blue and white stripes around it serve as holder for longer, excess length of the string for adjustable two sizes for the neck thickness =). Anyway, the button I sew on wasn't really user friendly as I tried to wear them but still usable.


 The size of this bow tie I made is slightly bigger compare to the orginal formal black bow tie i got from Daiso in order to match the proportion or keep proportionate to the big round button at the center. I hope you guys like it and I will further experiment on sewing bow tie or relevant ones.


Friday, April 1, 2011

Directory sign board design assignment

Hello! long time no update recently. I was busy doing assignments and some other outdoor activities.
This semester my class have this subject called environmental design which is for study about design exhibition stage and some sign board design, so will learn about some architecture stuff such as using their tools to design  draw accurately the stage or the standing board, etc.

below are the images of my final chosen design for directory in mall. 

the outline sketch with measurement planned well.

the outline digital form

after revision and further reference, changes are made.


this is the final design here. and the human figure beside it shows how big is the directory is.

 this is my first attempt to make the model mock up but my cutting skill and the sticking them together did not executed nicely. So, I didn't use this one.

After further developing the design and playing with texturing, patterns, I plan to redo the mock up with one different material added in which is the semi transparent color plastic card.


Done! but my cutting skill still bad hahaha.
--------------------------------------------------------------------------------------------------------
Some of my working in progress handcraft.


Sunday, October 24, 2010

Opinions for customize


can give me some comments? I don't know which one is better if based on my sketch although i didn't follow exactly the same from sketch, the mask is made of newspapers, metal wires, paint, spray mount, golden/silver powder, pva glue, plastic spoons that used for take away coffee cups, the flowers is made by newspapers with those beads. thread got from daiso.

Tuesday, October 19, 2010

Making Masquerades 2

Finally got my masks done yesterday, and just ready for using them for photo shoot, both of them are made of newspapers and metal wires/string to shape them, paint, and spray mount to cover one layer on top of the masks to maintain or make the mask slighty shiny.

I know the real one didn't look as huge as the sketch.. and i didn't add any flowers as i afraid of having too much details, do you think so?


I'm a.. fox? wolf? lolz